
Composition in Photography
Leggi questo articolo in ITALIANO
Have you ever looked at your photographs and didn’t quite understand what was missing?
One of the most difficult matters for the photographer is definitely light. But right after that, comes the arduous topic of photography composition.
An extremely interesting matter, because it allows us to understand how we can communicate with our audience. Since ancient times, images, whether they were drawings, paintings, or photographs, constituted a nonverbal language. The artist used this language to communicate thoughts and emotions.
But like all languages, photography has a coding that you absolutely must be familiar with and know how to use in your pictures if you want to capture the viewer’s attention.
The peculiarity of this form of dialogue is that your counterpart, your audience, must be able to understand what you want to tell. Even if your audience does not know the language you are communicating with.
Photography composition is a universal tool of expression based on elements of perception and psychology. These elements trigger cognitive processes in humans that lead to the decoding of the message, both consciously and unconsciously.
Simple elements such as colors or geometric shapes become powerful tools. Artists can mold and manipulate it at will to intensify the nonverbal message of the image.
What are the main rules of photography composition?
We have just stated that photography is a complex science, based on optical and psychological theories. But some theories and canons are universally recognized.
Here are some tips you can use in your shots that will help you carry the message you want to communicate to your viewers.
If you want to know more, here is an interesting article on the subject, written by the prestigious experts of Adobe Company: “Discover Photography Composition”
What is the most appealing format to the human eye?
Like all animals, humans’ eyesight is more oriented toward horizontal vision. In ancient times, this characteristic allowed us to better perceive threats around us.
Nevertheless, our cameras, from compacts to SLRs, are designed to allow us to create horizontal or vertical images.
First of all, it should be made clear that devotees of photography as a technique are particularly inclined to prefer the horizontal position. It is, at least on the surface, the orientation chosen by those who built the camera.
Although each of us develops a particular predilection for a photographic format over time, it would be a mistake not to choose the right orientation based on what we would like to communicate with a given image.
But when to choose whether to orient our camera horizontally or vertically?
Just think of the definitions of horizontal “landscape” and vertical “portrait” images.
This is regardless of the subject we are photographing. So the idea is to decide what our subject is, what is the image we want to capture, and only then decide how to hold the camera.
If our subject is person, logic itself suggests that the person is normally taller than wide, and so a vertical camera orientation is more natural. Conversely, if we are framing a group of people, it will be more appropriate to rotate the camera horizontally. If you want to know more, we have covered these topics in a separate article on How to photograph people.
The concept of depth of field.
To avoid the feeling of one dimension, an image must contain as naturally as possible several elements in different positions, closer and farther from our lens.
Foreground elements are extremely important, especially when the photograph has multiple levels of reading. They also give us the opportunity to create a kind of dialogue between what is in the foreground and the background.
Although this rule works with all focal lengths, it offers the best with wide-angle lenses, as the feeling of spatial depth is even more emphasized.
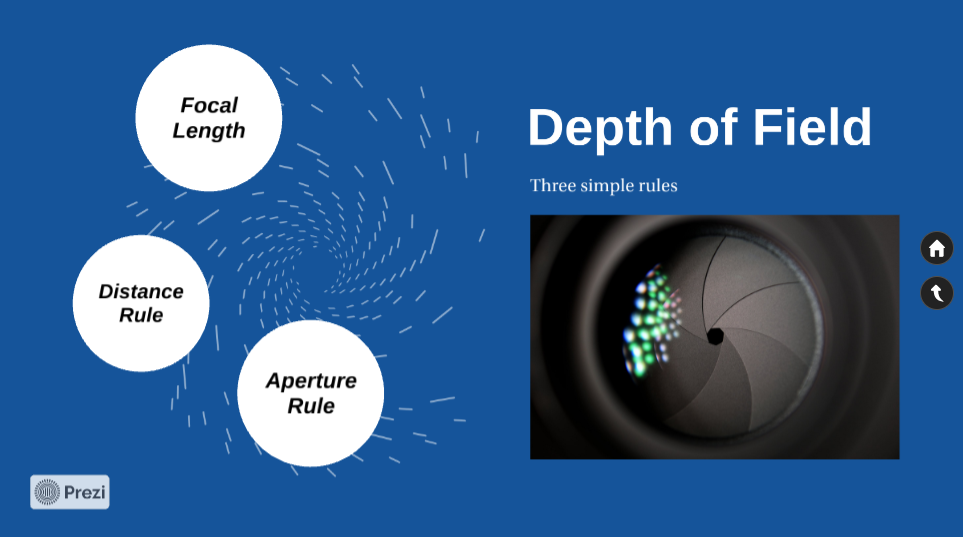
Depth of field is not a fixed measure and is determined by three factors.
We can intervene in the extent of depth of field (the diameter of the framing circle) through three practical tricks: the use of aperture, the distance to the point of focus (the main object on which we focus our attention), and the focal length of the lens we use.
See a quick presentation on managing the depth of field. An easy diagram to memorize.
And now that I’ve learned the rules, what is depth of field for?
We use depth of field to get better shots
It is simpler than it might appear:
Let’s think of a portrait, head/shoulder shot. How do we detach the subject’s face from the background, masterfully blurring everything behind it? Simple: let’s use an open aperture (f.1.4 or f.2.8 or f.3.5), shoot up close and choose a lens with a somewhat pushed focal length (say above 80mm).
Now let’s think about a landscape, where we want to have both a flower in the foreground and the mountains in the background in focus. How do we do this? Again, the answer is simple: we close the aperture (f.18, f.22, f.36), stay far away (just enough) and use a wide-angle lens (or at any rate a lens from 50mm and below).
Photography composition: How do we measure depth of field?
In the era of film and the mechanical rings that adjusted the aperture of lenses, the depth of field that was obtained at a certain aperture was indicated with useful notches.
Now with technology we can even download free apps, either for iPhone or Android. We have to set focal length, subject distance and aperture. The app will tell us with precision where the area in focus begins and where it ends.
If we manage depth of field, we’ll learn to take better photographs anyway.
Composition and the position of the subject.
In every photograph we take we should decide where to place the subject and what space it occupies within the frame. We need to pay particular attention to its proportions in relation to the surrounding space. We can also focus only on the subject, but when the surrounding context is significant the subject will occupy a small part of the frame.
Clearly, it is always preferred to rely on the center of the image.
Decentralizing the image, on the other hand, establishes a relationship between the subject and the background.
So the more we center the main subject symmetrically, the more static the image will appear. These rules were already known and used by painters and draftsmen Ben before the invention of photography.
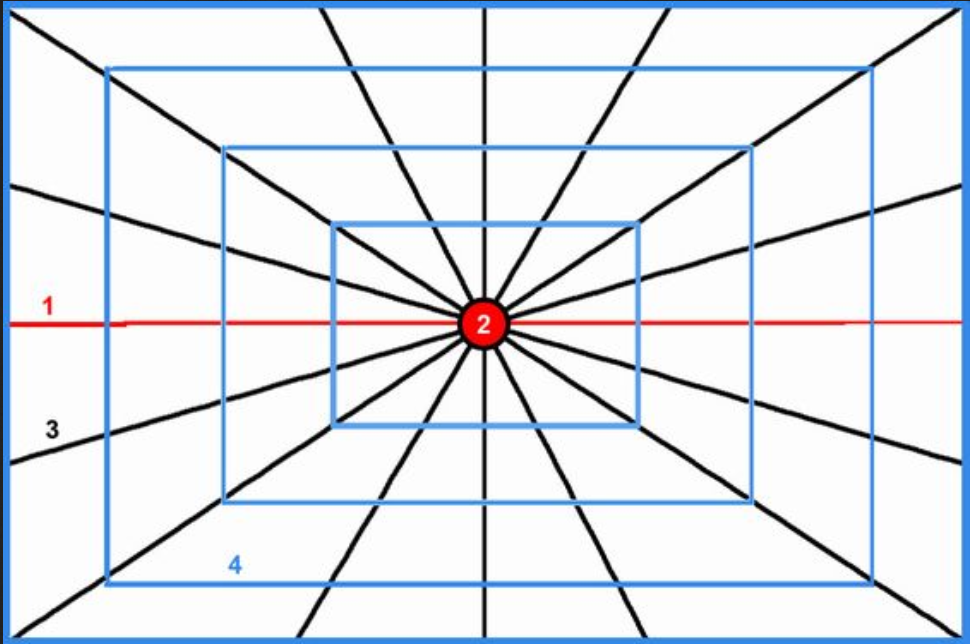
The most famous rule for photography composition: the rule of thirds.

The main rule of photographic composition is the so-called rule of thirds. An imaginary grid formed by two vertical and two horizontal lines. Thy must be equidistant from each other and from the edges of the image must be drawn.
In some digital cameras it is possible to reproduce this grid in order to manage the scene before shooting.
By placing the main subjects in the intersections of the grid we have created, the image will have a greater sense of dynamism and movement. By the same principle, it is possible to place the main subjects on the lines drawn horizontally and vertically. But also on the diagonals joining the intersections of the grid.
Frames.
Some natural elements such as trees and branches but also doors and walls can be used as frames: they will isolate and highlight the main subjects. These frames are intended to guide the eye to the subject we want to highlight.
Tips and ideas for photography composition: Perspective
Another component that indicates the relationships between subjects in the photograph is perspective.
As in the study of perspective for painters and drafters, photographic perspective is made up of parallel horizontal lines. These lines are in a grid of diagonal lines going toward a focal point. Again imagine these lines and channel them toward our subject as the vanishing point guides the eye naturally…. with a little trickery.
Photography is an art.
As such it contemplates complexity. It makes use of rules and “tricks,” certainly, but we need to develop some basic qualities. The first is certainly the ability to observe. Certainly this is also a quality that we can learn through practice. Simply by looking around, analyzing what we see and closing our eyes, imagining our picture.
And we will learn to be better observers and better photographers.